Category: Uncategorized (Page 3 of 4)
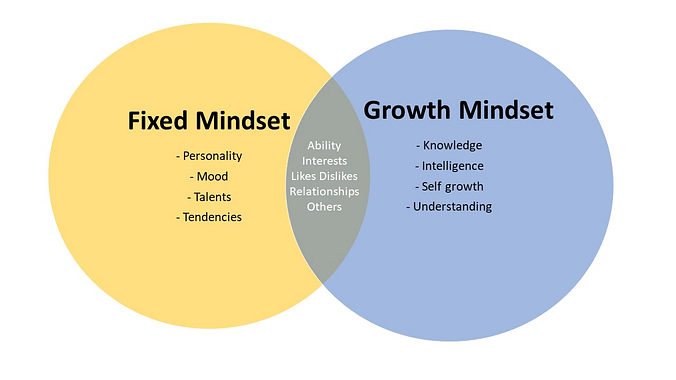
I used to think that I had a growth mindset. Ever since I learned about brain plasticity, I have based everything on the fact that learning is dynamic. I have always recognized that one of my greatest strengths has been the ability to keep learning throughout my life. It came as a shock when I finally got to know and understand my fixed mindset! Lets go over some common myths of what growth mindset is and isn’t.
Myth #1 People either have a fixed mindset or a growth mindset.
There is no either or. Growth mindset is not a switch that can be flicked on or off. Everyone has a growth mindset in some areas and a fixed mindset in others. Changing your mindset is about identifying where your fixed mindset is and what triggers it. If anyone claims to “have a growth mindset” then they have a fixed mindset about growth mindset. It is this realization that brought me to my next level of growth. Developing a growth mindset is just as much about recognizing where and when your fixed mindset comes out as it is about positive thinking. Like me you might have a growth mindset about learning but a fixed mindset about your personality for example.
Myth #2 Growth mindset is synonymous with positive thinking and open mindedness.
Growth mindset on a surface level seems simple. Just think positive and you will achieve your dreams! Anyone who has ever worked towards their dreams will argue otherwise. Positive thinking might help point you in the right direction but just sitting around thinking something will get you nowhere. Achievement only comes with work and commitment, and that is what growth mindset is, the commitment to work and achievement!
Positivity can actually be very toxic without checks. Toxic positivity is when someone is purely positive without questioning their actions. Toxic positivity can actually lead to the development of a fixed mindset. A growth mindset can not be achieved without constant questioning and corrections.
Myth #3 Growth mindset is synonymous with hard work.
A lot of people think that if they work hard enough they will achieve their goals. If they are not achieving their goals they just need to work harder. I’m here to tell you that hard work does not always accomplish your goals, and sometimes it does just the opposite. Stubbornly working away at something that is not progressing is pointless. Growth mindset involves smart work, not hard work. Work that is committed to improvement.
My husband and I have an ongoing joke about false growth mindset. One day when I was reaching for something at the top of the cupboard I said “I can’t reach it… yet. Just wait until I grow!” This is obviously not an option for me. I can’t believe myself into getting taller. What I should have said instead was “I can’t reach it yet… let me go grab a stool.” Don’t just try harder to reach your goal if it is out of your grasp, look for tools and new strategies that could get you where you want to be.
Myth #4 You can do anything if you just believe in yourself!
Growth mindset isn’t about being the best at something, it is about improving yourself. It does not mean that you can do anything, it means that you can improve at anything. You might not be Micheal Jordan, but you can improve your aim.
When you focus on improving yourself you both make your expectations realistic while at the same time remove your limitations. You have removed your self imposed ceiling, so now you are now free to feel happy about your self improvement, and possibly free to surpass your previous ceiling.
Myth #5 Growth mindset is unachievable
Growth mindset gets lumped in the “miracle fix” category sometimes. It seems like a very fanciful idea, and I think that impression often comes from a lot of the other myths about growth mindset. You can’t just accomplish your dreams because you believe in yourself, you can’t just work hard until you succeed, and a growth mindset isn’t unachievable because everyone already has a growth mindset in some areas. It isn’t like you flick the “growth” switch on and have instant success. It is about slowly changing your thought patterns to make you more positive, creative, and innovative.
Want a great growth mindset tool?
The Brian the Brain series teaches neuroscience to kids to help strengthen their mindset. https://www.jennymouse.com/store
Learn how stem education can build a growth mindset:https://www.jennymouse.com/blog/how-stem-mental-health-books-build-a-growth-mindset-in-kids-at-home-in-class

Are your kids bored and looking for a fun activity to challenge them? Try building the Circuitmess Nibble!
If you are like me, it’s been a challenge coming up with activities to keep your children busy during these lockdowns and quarantines.
The product we are reviewing today provides many learning opportunities and practical life skills for your eager learners. We will look through the whole process, from ordering, building and the next steps for the Circuitmess Nibble.
Circuitmess Nibble Description
The Circuitmess Nibble is a DIY (Do it yourself) handheld game console. The kit comes with all of the parts you will need to assemble the console.
Through building this kit your child will learn:
– how to Solder components onto a circuit board
– how game consoles are assembled and what parts make up a console
– how to load software onto the console
– how to code their own games (an extra activity after the console is made)
– a huge sense of accomplishment
Disclaimer: I am not sponsored or funded by Circuitmess. I am a programming teacher and thought this product had some great educational potential so I wanted to share my experience and my own thoughts. I assembled this myself to test out the process. No technical background is needed to build this product. Parent involvement is required.
All right let us start!
Ordering the Nibble

I purchased my Nibble from the Circuitmess store. At the time of writing this, they have a 20% early-bird deal. The kit costs $99 CAD, and comes with free worldwide shipping. I have also seen kits sold on amazon, and through select hobby/maker stores here in Canada however quantities are limited and I’m not sure if those stores provide free shipping or not.
Shipping
Circuitmess ships their kits through DHL. The package can be tracked and gives you notifications if they require any updates on the package.
I ordered my kit on Feb 27th and received it on March 3rd (4 days total), well before the “Expected” delivery date of March 8th. I was very happy by the speed of the shipping as it is being shipped all the way from Croatia. It also arrived in perfect shape which is always excellent.
My only issue with ordering was that there is an “Import Duty” on the package, which cost me around $29 CAD which is substantial when I was unaware of any additional fees I would have to pay. This fee may vary depending on your country’s tax and import fees. This is on the shipping company itself, not an issue with the product from Circuitmess.
Building the Nibble
For this build I used Circuitmess’ online tutorial
I have created my own build video here:
The guide is quite comprehensive and has plenty of pictures, notes and supports various languages as well.
Before starting there are soldering guides that are appropriate tutorials first time soldering.
They recommend some extra tools to help with the build process, the only one I found would have helped was the “helping hand” tool.

For myself I used everything included in the box except the screw driver as I preferred mine. I also used a soldering mat to help organize components and prevent my desk/work area from being burned.
The build is very straight forward:
- Solder the buttons on
- Solder the power switch on
- Solder the screen on
- Solder the battery container on

Solder the buttons on 
Solder the power switch 
Solder the screen 
Solder the battery
- Insert the fuse
- Insert the batteries and test the console

Insert the fuse above the power switch 
Moment of truth, turn it on and see if it works!
- Peel the plastic off of the acrylic case
- Assemble the back case
- Assemble the front case
- Add the battery cover

Peel off the plastic from the case 
Add the mounts and the back case 
Add the front casing 
Add the battery cover and you’re finished!
I will be releasing a full video build later this month, going further in depth into the build.
Build Challenges
The only things I found slightly challenging with the build was adding the screen and the battery container.
The buttons and the power switch have a feature that allows them to clamp onto the board making soldering easy. The screen does not have that feature which makes it a bit fiddly. You need to carefully lay the console down flat on its face, on the screen itself, when soldering. When you do this, make sure that A) you keep pressure off of the device and the screen so you do not break it and B) that the device is balanced so the screen doesn’t end up soldered on an angle.
As for the battery container, I had a hard time getting it to lay flat on the back of the device. I’m not sure if my battery container was warped, but it ended up crooked after soldering. You can see how my battery container turned out in the picture below.

I was elated when I turned the device on after soldering to find that there were no issues with it and that it was working 100%! This means that all of the solder joints were done correctly and I did not have to re-do any of them.
Next Steps for the Nibble
After building the device what can you do with it next?
Games
The Nibble comes with 4 games on it: Pong, Space Invaders, Snake, and Asteroids. You can add some more games for it that have been developed by the community, such as this version of Sokoban (a block pushing puzzle game) https://github.com/snsdosen/NibbleSokoban
You can program games for it too! It can run any games programmed in C/C++, Python and CicuitBlocks (Their own graphical programming engine, similar to Scratch)
Mods
Because the Nibble is made from a ESP8266 board, it can be reprogrammed or modified. There is a lot of open-source software that you can freely access and modify.
I will be releasing a few modifications for the system here over the next couple months so stay tuned.
Customize
An easy way to make this device your own is to customize it to tailor your own style.
Some customization options can be simple changes to the case itself like stickers or custom paint jobs.
Conclusion
I thoroughly enjoyed this build. I practiced my soldering skills and will be kept busy developing games, modifications and customizations for this product. I am an online programming teacher, so contact me if you are interested in a class or tutorial to help your child assemble or program their unit. The build was straightforward and easy to do. The feeling of satisfaction from turning the console on after your soldering and having everything work…that was just fantastic!
My only issues with the kit and the whole experience were the unknown import fees, the battery container not sitting flat on my particular unit, and that I wish there was a screen cover. As soon as I gave it to my 4 yr old to try playing, there were smudges all over the screen, so I may have to try building my own screen protector. As for the battery container, I did contact Circuitmess and they responded in less than 12hrs. Talk about fast! They said that the container was fine. It doesn’t affect the performance of the unit so I’m not too worried.
Rating: Build It!

Stay tuned for more content on the Circuitmess Nibble!
Written by Nathan Misener
Need more activities to stay busy? Try our free monthly activities here.

When you think of motivation you might think of a reward you’ve been promised if you complete your chores, a friend encouraging you to try something new, or maybe even just doing something you enjoy! Motivation is anything that makes us want to do something. Like everything else we do, motivation is controlled by the brain. Looking at how the brain works can help us understand why we love to do some things, but struggle to finish others.
Psychology of Motivation for Kids
Some of the simplest things we can be motivated to do are things that we need to do to survive, like eat and drink. Feelings of thirst or hunger drive us to eat or drink. After we have had something to eat or drink we feel satisfied which acts as an incentive for us to want to eat or drink again.
Need: something our body or brain needs to stay healthy or balanced.
Drive: something that pushes us to do something that will satisfy our need.
Incentive: something that satisfies our need or drive.
It is these needs, drives, and incentives that make up our motivation! For example if we are bored it is because our brain needs more stimulation. That feeling of boredom drives us to find something to do. The game or hobby we choose to play/ do to satisfy our boredom is our incentive.
Another example is when someone tells us we need to do something, like when we are given an assignment. When someone else tells us what we need to do sometimes it can be harder to find the drive to do it. That person’s expectations might be enough of a drive for you, but if it is not you might need help keep you on track. Your parent or guardian might create a drive by telling you that you have to do your work before you can play. Once it is finished the relief that it is done can act as an incentive, or maybe the incentive is the game you get to play now that it’s done.

How to motivate yourself with three simple steps
- First identify what you want to motivate yourself to do. This is your need.
- Second, figure out why you need to do that thing. This is your drive.
- Finally figure out what kind of reward you need to complete your task. This is your incentive.
Did it work?
If you were not able to motivate yourself, revisit your plan.
You’re going to find that one or more areas of your three steps wasn’t strong enough.
Your need: The thing you want to do isn’t something that you truly feel you NEED to do. Decide if your goal truly is something that you need to dedicate so much time and effort to. If the answer is no it is ok to change your goal to suit your needs.
Your drive: You do need to meet your goal but you are still struggling to get it done. Ask yourself if your goal is something you need to do right NOW. If it isn’t ask yourself when you do need to meet your goal by. How much of your goal do you need to get started on now? That is your new goal. Set yourself due dates based on your need.
Your incentive: Your goal is something you need to do, and it’s something that is very important for you to get done now, but you are still struggling. This means that your incentive is not strong enough. Make a list of things that motivate you and figure out what you would like to work for. You might need to get a friend or family member to help you by giving them the incentive and instructing them not to give it to you until you have completed your task.
Incentives might include something you get like a favorite food, money, or time to do a favorite game or activity, but incentives don’t have to be complicated! Sometimes simply restructuring your day can make getting your goal done more incentivizing. For instance you might simply work on your goal for 15 minutes before your evening netflix binge.
Read more topics about psychology for kids here: https://travelingchalkboard.com/kids/learn/

A psychologist named Sigmund Freud was responsible for founding the school of psychology called “psychoanalysis.” Psychoanalysis is the study of the subconscious mind (things our brain does that we are not aware of). A big part of what Sigmund Freud did was analyze dreams. Sigmund Freud was not very scientific in the way that he worked, so most of what he believed has been proven incorrect, but he did get us thinking about the subconscious mind and we have learned a lot more since he was alive!
If you want to have some fun you can take a look in a dream dictionary like this one and see what your dreams are “supposed” to mean. Just remember that these dream interpretations are not scientific, they are just for fun!

So what is going on when we dream? Scientists now know that the brain doesn’t just shut off when we sleep, the whole brain is actually active! Scientists still have a lot to learn about why our subconscious mind is busy having a party while our conscious mind slumbers. What they do know is that sleep is important to help our brain store memories, grow new neural connections, and function properly.
A theory known as the Activation-Synthesis theory says that dreams are created because our mind is trying to make sense of all of that subconscious activity! Our mind likes to interpret things. If there are a whole bunch of nerve cells sending random messages around our brain, it wants to string them together to create a story. It is just like when you look up at the clouds and see different shapes in them!
Read more about the brain and other interesting topics just for kids!
Sources
http://healthysleep.med.harvard.edu/healthy/matters/benefits-of-sleep/why-do-we-sleep

Who was Jean Piaget?

Jean Piaget was a psychologist from Switzerland that studies brain development (how the brain grows). He noticed that children learned certain things and certain times, and he created a theory as to why. As children learn they add to the amount of information that they know, but something interesting happens as children grow. Piaget realized that there were changes happening in children’s brains as they grew. Those changes let the children think differently at different stages. He divided those stages up into four parts based on how the children thought.

What we know now.
Piaget gave us an idea of how children’s brains change and grow. It was really important to realize that children are not just miniature adults! His theory was not perfect though. Now scientists have a lot more tools to help them understand the brain. They have also done more studies to help them understand how children learn.
Piaget’s stages help give teachers and parents an idea of what they should be focusing on in class or at home, but children all develop at different speeds! Some 4 year old children might be able to think logically, and some 13 year old children might have trouble thinking abstractly. That is OK because people are individuals not robots!
Learn more about your brain at learn for kids!

Play is learning right? PERFECT! Just buy some toys, stick them in front of your kids and call it an education… right? Not quite. Instead you have to harness play for learning!

Play is a very effective way to teach children, but if it seems too good to be true it probably is. Play is most effective if it is planned and guided. Children need mental stimulation, and with a little bit of your help play can give them that. Below are some ideas to harness your child(ren)’s play for learning! As anything else with parenting the time spent teaching your child(ren) through play will pay back in time. Remember there is no one size fits all in education. This article is meant as a guide for play based learning, use what works for your family!
Guided play
You have probably noticed that if left unchecked your child(ren) may become bored with the toys/ activity that they are doing, get in a fight with each other over their toys, or go into destructive mode and begin playing with the toy in an inappropriate way (like drawing on the table, or throwing things around the room). The part of the brain that controls focus, planning, and decision making is the frontal lobe. The frontal lobe is still developing well into adulthood, so it is no surprise that your little one has trouble figuring out how to play with their toys, share, and plan a well structured game that lasts for more than 15 minutes.
Your child(ren) keep pulling you away from the task you are trying to accomplish for a good reason. They need your frontal lobe to help them figure out how to play. Guide their activity by giving them suggestions, asking questions, and demonstrating how to play together. Sometimes you will have to play intermediary to help them work out disputes.
The amount of structure needed will depend on your child(ren)’s personality and their developmental level. The more time you spend guiding their play the better they will be at playing independently because you will be giving them a structure to use in their play. Every time they have an argument that you facilitate you model how to problem solve. The next time they get in a fight they will be that much more prepared and you will be able to step back a bit as facilitator.
Through guided play you:
- Harness the learning power of toys (choose toys based on your child’s developmental level and interests).
- Develop social skills
- Develop problems solving skills
- Explore difficult feelings/ situations in a safe space
Area set ups
Set up your child(ren)’s play space to optimize learning. This might look different depending on how much space you have in your home. If you have a big play area you can set up a few different area set ups based on topics like math, science, pretend play, art, library, and physical play. If you have limited space you might want to rotate through different areas/ topics so your play space does not get cluttered.
For those of you in a small home you can create “area boxes” instead. If possible create a dedicated play space in your home. Fill Tupperware bins with play activities for each different topic. Print off images of the play activities and tape them to the top of each bin. Your child(ren) can choose which bin they would like to play with just as they would choose which area set up they would like to use. You might choose an outdoor space for physical play if your house is small.
Switch up your area set ups frequently. Play based learning centers often rotate learning areas on a weekly or biweekly basis. If you find that too time consuming try swapping out one area a week.
How to set up a Montessori area in your home https://livingmontessorinow.com/how-to-set-up-a-montessori-space-at-home/
How to set up a preschool. This can be applied to the home as well! There are a lot of ideas for area set ups based on different topics. If your child is older than preschool age just adjust the area set ups for their developmental level. https://www.preschool-plan-it.com/classroom-design.html
Pretend play
Playing pretend allows children to learn about a variety of different topics, and also lets them act out their feelings in a safe space. It is a great opportunity to develop language skills, and facilitate interactions between your children. Base your pretend play off of your child(ren)’s interests, and add costume and toys from around your house as props. The great thing about pretend play is it can be done almost anywhere with just a bit of creativity!
Why pretend play is important: https://www.pentagonplay.co.uk/news-and-info/why-pretend-play-is-important-to-child-development
Planned learning activities
Pay attention to your child(ren)’s interests and design play based activities that explore those interests. You might also build other learning opportunities into your day based on your child(ren)’s interests. You might choose YouTube videos to watch, find online classes, read books, and build learning areas centered around that topic.
You can also plan learning activities around topics that you notice your child struggling with. You can use pretend play to act out visiting the doctor or dentist, or play with dolls as a way to talk about a new sibling. Extend play into projects and experiments, and encourage your child(ren) to do developmentally appropriate tasks like keep notes if they are old enough, drawing pictures, and helping look up more information online.
Free exploration
Don’t structure everything, it is important for your child(ren to have free unstructured time. Your child(ren) might still need your help during free time (remember that developing frontal lobe), so don’t forget to supervise or make sure that you are available during free play. Outdoor play is a great way to use free time. You can also let your child(ren) play freely in your area set ups.
Learning from the world
Explore the outdoors, go for a walk and talk about nature, and (if safe and available) go to the library, museums, playgrounds, and other places where the world can be your child(ren)’s teacher. Use these experiences to plan new learning activities and area set ups!
The application of toys
Start thinking of your toys as “enrichment materials” and “learning tools” and you will start finding new ways to use them! Look for toys that match your child(ren)’s developmental level and promote or enhance learning. Toys and play based learning games can be a great way of teaching your child(ren) without them even realizing that they are learning. Don’t forget non-toy items as well. Tupperware lids make great pretend plates, bottles and other recyclables can be harnessed for crafts, and pasta boxes make great shakers.
Here is a great article about toys for different stages: https://childdevelopmentinfo.com/learning/multiple_intelligences/educational-benefits-toys/#gs.pk4zjg
Here are some milestones to watch out for in the first five years: https://childmind.org/guide/developmental-milestones/
And milestones for children from 6-12: https://www.stanfordchildrens.org/en/topic/default?id=the-growing-child-school-age-6-to-12-years-90-P02278
Think of toys as tools to help your child(ren) reach each milestone. Keep in mind that each child will reach his/ her milestones at a different pace, and it is normal for them to be behind or ahead in some areas. If you have any concerns about a developmental delay talk to your physician. You might notice that your child(ren) quickly catches up, but waiting lists for programs and assessments can be long, so it is important to be proactive in your child(ren)’s development.
Have fun and go harness play for learning!

Recent Comments